Bind : Monitor performances
With this project, you will have, for free, a way to track your Bind DNS server performances. This solution is based on the following products :
Here is the logical architecture :
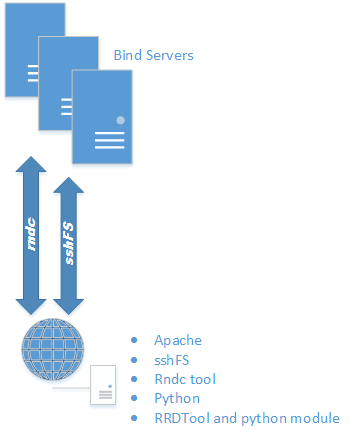
This is the requirements for the monitoring/webserver system :
– a linux server (for me it is a Debian one)
– apache
– rndc tool : apt-get install bind9utils
– RRDTool : apt-get install rrdtool
– python and rrdtool module : apt-get install python-rrdtool
First you have to configure your DNS Bind server to accept rndc commands from a remote host. Add the following lines in your named.conf file :
acl "rndc-users" {
     10.1.2.3;
};
controls {
     inet 127.0.0.1 allow {localhost;};
     inet * port 7766 allow {"rndc-users";};
};
The IP address specified is the IP address of your monitoring/webserver system. The TCP port 7766 is used for rndc communication between the monitoring and the DNS server. To be able to generate the named.stats file in the Bind log folder, add the following line in the “options” section in the file named.conf.options of your Bind server(s) :
options {
	...
        statistics-file "/var/log/bind/named.stats";
	...
};
On the Bind server, you can now reload the Bind configuration files : rndc reload
On the monitoring/webserver, you have to add the rndc key of each Bind server you want to manage by editing the file /etc/bind/rndc.conf as follow :
//dns-server01.domain.local RNDC Control
key rndc_ns01_key {
        algorithm "hmac-md5";
        secret "K45r1jhzh0mRkv8zQ06zzA==";
};
server dns-server01.domain.local {
        key     rndc_ns01_key;
};

//dns-server02.domain.local RNDC Control
key rndc_ns02_key {
        algorithm "hmac-md5";
        secret "xxxdfwedfshdRkv8zQ06zzA==";
};
server dns-server02.domain.local {
        key     rndc_ns02_key;
};

//dns-server03.domain.local RNDC Control
key rndc_ns03_key {
        algorithm "hmac-md5";
        secret "h6vr1jhdfhfghk35estRRzA==";
};
server dns-server03.domain.local {
        key     rndc_ns03_key;
};
The secret keys can be found on each Bind dns server on the following file : /etc/bind/rndc.key
You can test if the rndc command works from the monitoring/webserver : rndc -s dns-server01.domain.local -p 7766 status
You can uncompress the following file on the monitoring/webserver folder /var/www . A new folder will be created containing the web pages, the libraries and the monitoring script.
Now you have to configure the sshFS mount points between the monitoring and DNS servers. The folder /var/www/dnsmon/log will be the root folder. Create inside one folder per DNS server :
mkdir /var/www/dnsmon/log/dns-server01
mkdir /var/www/dnsmon/log/dns-server02
mkdir /var/www/dnsmon/log/dns-server03
On the monitoring/webserver create the ssh key with no passphrase :
ssh-keygen -t rsa
Generating public/private rsa key pair.
Enter file in which to save the key (/home/a/.ssh/id_rsa): /folder/.ssh/sshfs_rsa
Created directory '/folder/.ssh'.
Enter passphrase (empty for no passphrase):
Enter same passphrase again:
Your identification has been saved in /folder/.ssh/sshfs_rsa.
Your public key has been saved in /folder/.ssh/sshfs_rsa.pub.
You can now copy the public key on your DNS servers :
cat /folder/.ssh/sshfs_rsa.pub | ssh user01@dns-server01.domain.local 'cat >> .ssh/authorized_keys'
cat /folder/.ssh/sshfs_rsa.pub | ssh user02@dns-server02.domain.local 'cat >> .ssh/authorized_keys'
cat /folder/.ssh/sshfs_rsa.pub | ssh user03@dns-server03.domain.local 'cat >> .ssh/authorized_keys'
On the monitoring server, edit the /etc/fstab and add the lines :
sshfs#user01@dns-server01.domain.local:/var/log/bind    /var/www/dnsmon/log/dns-server01    fuse    port=22,IdentityFile=/folder/.ssh/sshfs_rsa,ServerAliveInterval=60 0 0
sshfs#user02@dns-server02.domain.local:/var/log/bind    /var/www/dnsmon/log/dns-server02    fuse    port=22,IdentityFile=/folder/.ssh/sshfs_rsa,ServerAliveInterval=60 0 0
sshfs#user03@dns-server03.domain.local:/var/log/bind    /var/www/dnsmon/log/dns-server03    fuse    port=22,IdentityFile=/folder/.ssh/sshfs_rsa,ServerAliveInterval=60 0 0
You can now, launch the following command to mount the new points added before : mount -a
Now, you have to configure the file
/var/www/dnsmon/rrdconfig.ini
according to your environment.
Try to launch manually the monitoring script : python monitor.py
The following folders will have some new files : images, rrd and xml
If it is ok, you can now set the cron job on the monitoring server:
crontab -e
>>> line to add : */5 * * * * /usr/bin/python /var/www/dnsmon/monitor.py &
service cron restart
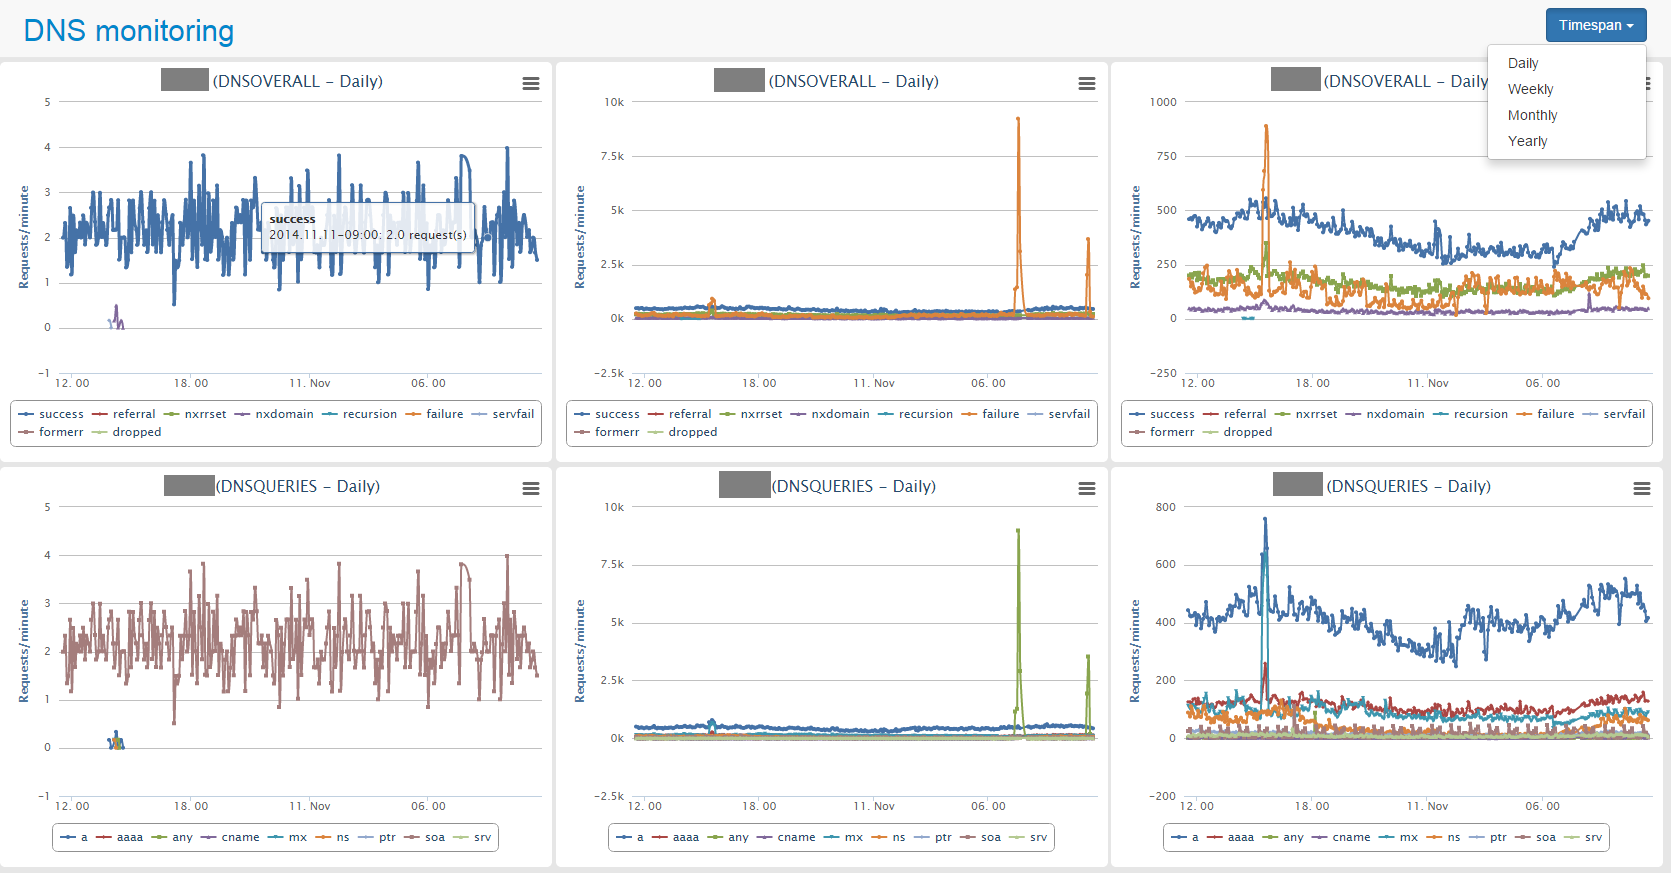
Go to the url : http://yourwebsite/yourfolder/grid.php?timespan=Daily
This is a first shot documentation. Do not hesitate to leave a comment if there is something wrong or missing.
What version of python did you use for this?
python monitor.py
File “monitor.py”, line 83
for timespan in timespans:
Running pythong 2.6
Hello TomT,
I’m running the version 2.7.6 for Python
Cheers, managed to get it going 🙂
I’m having a few issues adding more than one host though, /etc/bind/rndc.conf doesn’t seem to exist and adding the server params into /etc/rndc.key throws an exception. Going to bash around with it today to try get it going.
Nvm, figured it out 🙂 Bind will by default first search for /etc/rndc.key before it uses /etc/bind/rndc.conf. I deleted the /etc/rndc.key and everything is happy 🙂